GreekChat.com Forums
>
GLO Specific Forums
>
Phi
>
Phi Mu
I made this for my daughter!
User Name
Remember Me?
Password
Register
FAQ
Community
Calendar
Today's Posts
Search
Community Links
Members List
Search Forums
Show Threads
Show Posts
Advanced Search
Go to Page...
»
Search Forums
»
Advanced Search
» GC Stats
Members: 331,850
Threads: 115,721
Posts: 2,207,919
Welcome to our newest member,
aaylausasdo6509
»
Online Users: 981
2 members and 979 guests
Cookiez17
» GC Navigation
-
Homepage
-
Forum Index
-
Greek Life
-
Recruitment
--
Sorority Recruitment
--
Fraternity Recruitment
--
Recruitment Stories
--
Alumnae Initiation
-
Risk Management
-
Chapter Operations
-
Alumni Involvement
-
Community Service
-
Locals
-
Up & Coming Nat. GLOs
-
Social
-
Events
-
Fundraising
-
General Chat Forums
--
Chit Chat
--
News & Politics
--
Entertainment
--
Dating & Relationships
--
Cool Sites
--
Academics
--
Careers & Employment
»
GLO Specific Forums
Alpha
-
Beta
-
Gamma
-
Delta
-
Epsilon
-
Zeta
-
Eta
-
Theta
-
Iota
-
Kappa
-
Lambda
-
Mu
-
Nu
-
Xi
-
Omicron
-
Pi
-
Rho
-
Sigma
-
Tau
-
Upsilon
-
Phi
-
Chi
-
Psi
-
Omega
-
NGL
Thread Tools
Display Modes
Prev
Next
#
1
08-23-2008, 03:34 PM
phimu88
GreekChat Member
Join Date: Mar 2008
Posts: 163
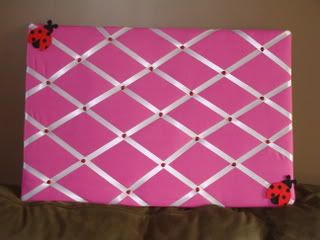
I made this for my daughter!
I am so proud of it lol ... it took me about an hour to make and I love the way it turned out! The tacks in the middle are little ladybugs! It is for her new dorm room.
phimu88
View Public Profile
Find all posts by phimu88
«
Previous Thread
|
Next Thread
»
Thread Tools
Show Printable Version
Display Modes
Switch to Linear Mode
Switch to Hybrid Mode
Threaded Mode
Posting Rules
You
may not
post new threads
You
may not
post replies
You
may not
post attachments
You
may not
edit your posts
BB code
is
On
Smilies
are
On
[IMG]
code is
On
HTML code is
Off
Forum Rules
Similar Threads
Thread
Thread Starter
Forum
Replies
Last Post
Name your daughter and son
Special1920
Zeta Phi Beta
142
12-15-2010
03:52 AM
Are you a Daughter of Job?
NinjaPoodle
Chit Chat
15
10-08-2009
12:39 AM
What would you do if your daughter....
Convinced
Alpha Kappa Alpha
102
05-31-2007
12:16 PM
Would you buy this for your daughter?
sugarplumfairy
Chit Chat
34
10-04-2006
04:59 AM
AGD Daughter...
AlphaXiStarlet
Alpha Gamma Delta
21
08-09-2001
11:03 PM
All times are GMT -4. The time now is
04:11 PM
.
Contact Us
-
GreekChat.com
-
Archive
-
Top
Powered by vBulletin® Version 3.8.11
Copyright ©2000 - 2025, vBulletin Solutions Inc.


 Threaded Mode
